Appearance
FOTA Upgrade Example
Introduction
FOTA upgrade of QuecThing generally refers to the process of writing new firmware into the IoT platform and software solution module and updating the original firmware. In all upgrade mode, you need to upload the new firmware package to Developer Center, and the device obtains the firmware package from Developer Center to realize OTA upgrade. The device itself can update features accordingly. This sections explains how to perform a FOTA upgrade in QuecOpen solution.
Related APIs
| Function | Description |
|---|---|
| Ql_iotCmdOtaRequest() | Requests OTA Upgrade Plan from Developer Center. |
| Ql_iotCmdOtaAction() | Configures OTA Upgrade Operations. |
Note: See OTA Upgrade API for details.
Procedure
1. Log in to Developer Center
Log in to Developer Center. If you don't have an account, click Register Now to register.
2. Create a Product
Creating a product is the first step in product development. A product is an abstract description of a class of devices defined by Developer Center. A product is used to manage devices of the same category. For example, if you have an aromatherapy diffuser with LTE networking capability and you need to connect the aromatherapy diffuser to Developer Center to monitor it, you can define it as a product "Smart Aromatherapy Diffuser".
3. OTA Upgrade Operations
a. Add a Version Package
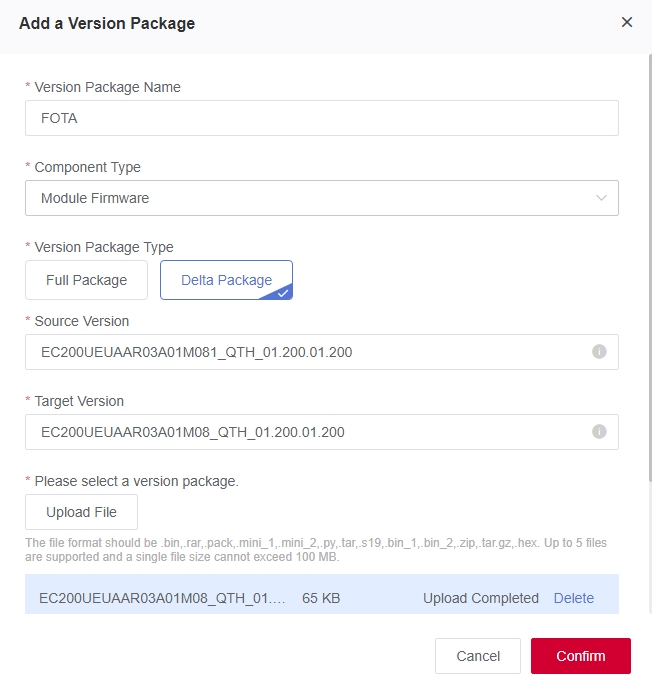
- Version Package Name: Version package name.
- Component Type: Module firmware or MCU firmware.
- Module firmware upgrade (FOTA): Write the new firmware to IoT platform and software solution module.
- MCU firmware upgrade (SOTA): Download the new software package to the external MCU through Quectel module.
- Version Package Type: Full Package or Delta Package.
- Delta Package is for upgrading the specified original version, i.e., for minor feature upgrading or bug fixing.
- Full Package is not for a specified source version, and all devices can be upgraded.
- Source Version: Version of the source firmware package. This item is displayed if "Delta Package" is selected, but not the "Full Package". (Developer Center determines whether the version number in the device information reported when the device connects to Developer Center is consistent with this parameter. If it is consistent, Developer Center issues the upgrade information.)
- Target Version: New version number of the firmware package. (Once the device is upgraded, it needs to report the upgraded version number to Developer Center. Developer Center will check whether the version number reported by the device is consistent with this parameter. If it is consistent, the upgrade is successful.)
- Upload File: The file format should be .bin/.zip/.rar/.pack/.mini_1/.mini_2/.py/.tar/.tar.gz/.s19/.bin_1/.bin_2. Up to 5 files are supported and a single file size cannot exceed 100 MB.
- Remarks: Information describing the uploaded firmware version.
b. Verify Firmware Package (Optional)
Firmware verification is for ensuring the security and availability of the firmware to be mass upgraded to minimize the upgrade risk in case of unexpected losses. Before mass upgrading devices, you may verify a single device’s firmware and perform the OTA upgrade.
i. Select the version package to be verified and click "Firmware Verification".

ii. Select the device to be verified, enter the component identifier to be verified and then submit the verification.
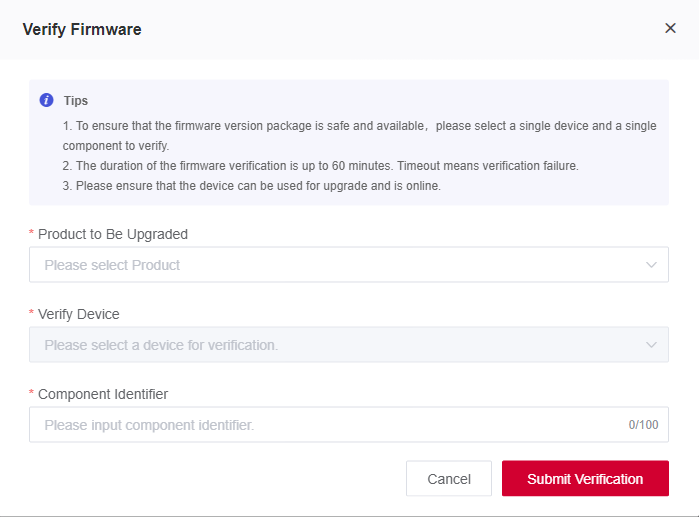
iii. Click "Details" of the version package to view the "Verification Details".

c. Create an Upgrade Plan
An upgrade plan should be created or selected from existing plans before a device upgrade. The plan contains device(s) to be upgraded, upgrade time, components configurations and etc.
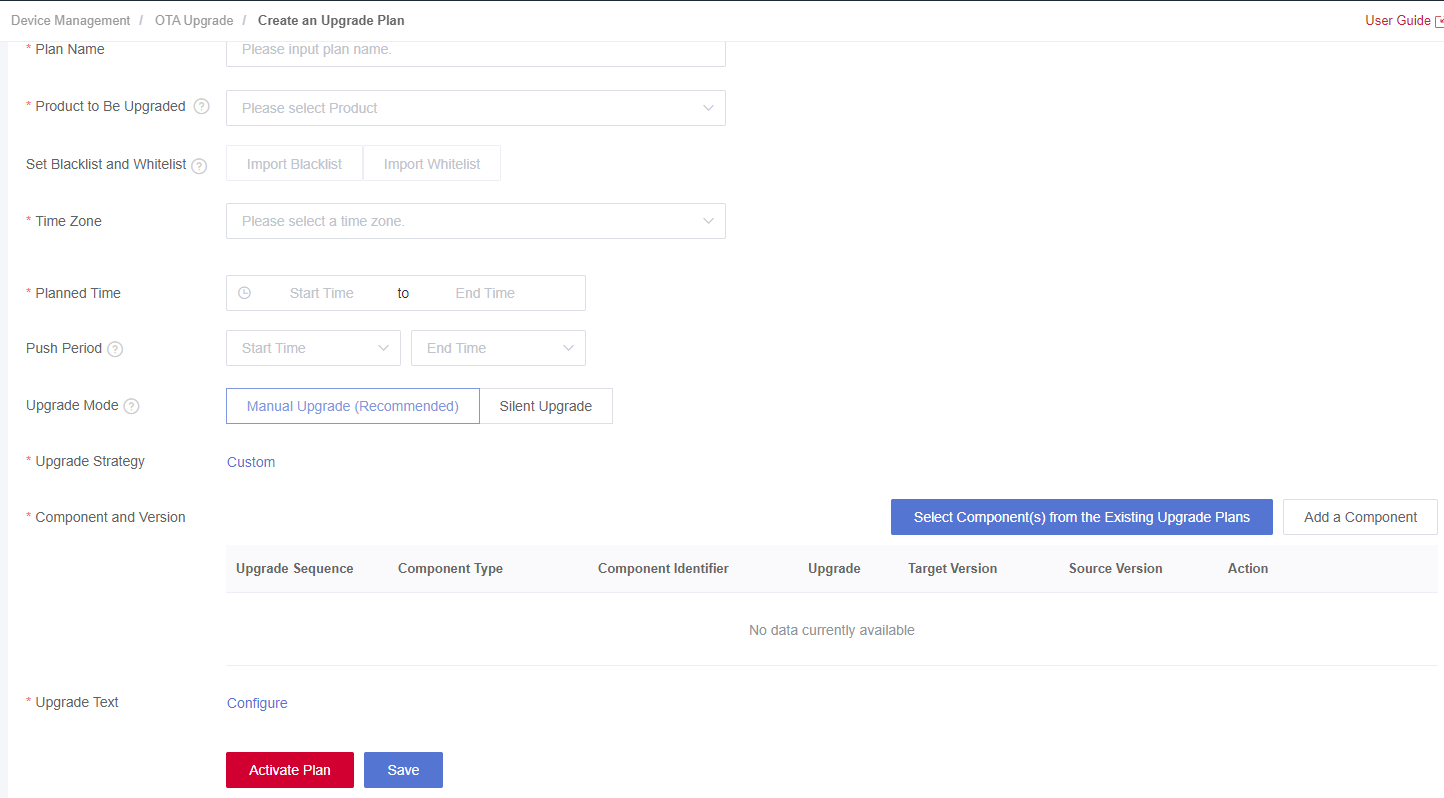
i. Fill in Basic Information
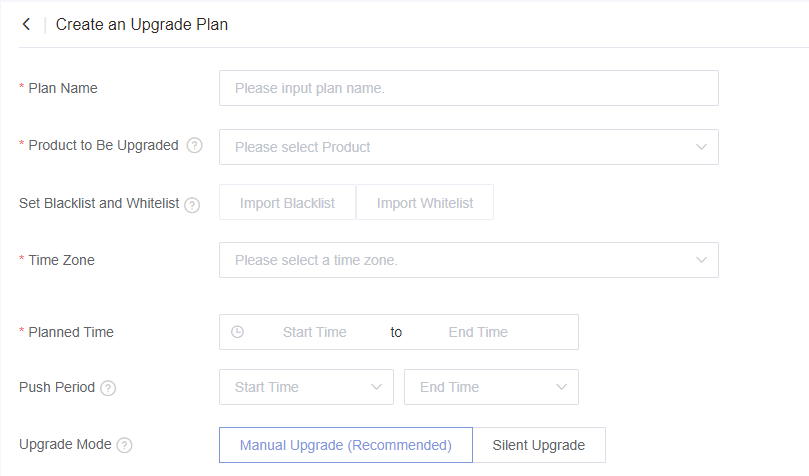
Plan Name: Plan name.
Product to Be Upgraded: The product which needs upgrading.
Set Blacklist and Whitelist: All devices under the product will be upgraded if no whitelist or blacklist is set. The blacklist has a higher priority than the whitelist if both whitelist and blacklist are set.
- Whitelist: Only the device(s) in the whitelist can allowed to be upgraded.
- Blacklist: The device(s) in the blacklist cannot allowed to be upgraded.
Time Zone :A required parameter. Developer Center will only push the upgrade plan during the push period in this time zone.
Push Period :An optional parameter. Configure the period of Developer Center automatically pushing the upgrade plan.
Upgrade Mode :
Silent Upgrade: Upgrade is automatically completed by the application, without requiring any user confirmation. The device will be upgraded and restarted in the new version once it is opened again.
Manual Upgrade: You need to enter the "Device Control" page, check and confirm the firmware upgrade on the "Device Details" page.
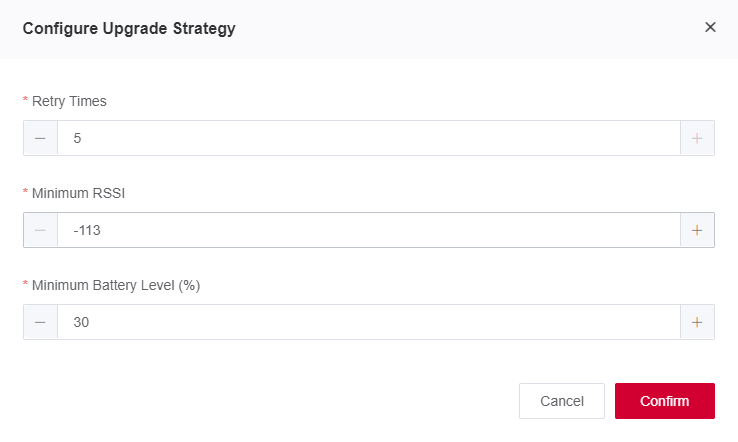
ii. Formulate Upgrade Strategy
During the firmware upgrade, it is inevitable that the upgrade fails due to a poor upgrade environment. To avoid this situation, you need to formulate an upgrade strategy to reduce the probability of upgrade failure. Click Custom next to the "Upgrade Strategy" to configure the upgrade strategy in the pop-up window.
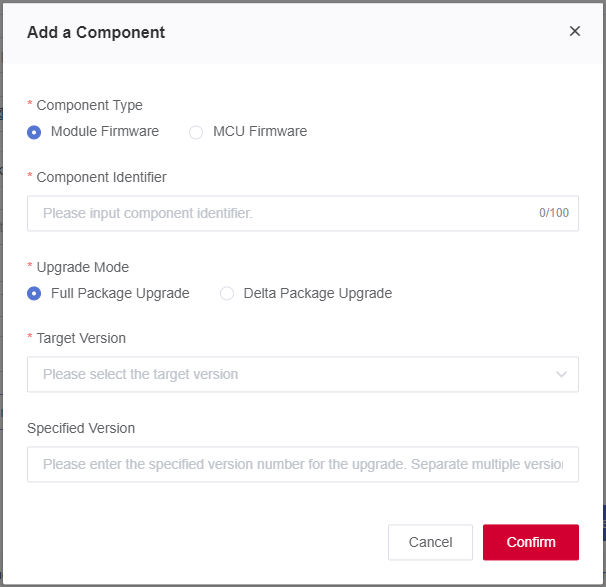
iii. Add Upgrade Component
The upgrade component is a collection of one or more components created by the user. It is used to select and plan the product components that need to be upgraded when you create the upgrade plan, Component identifier must be unique.
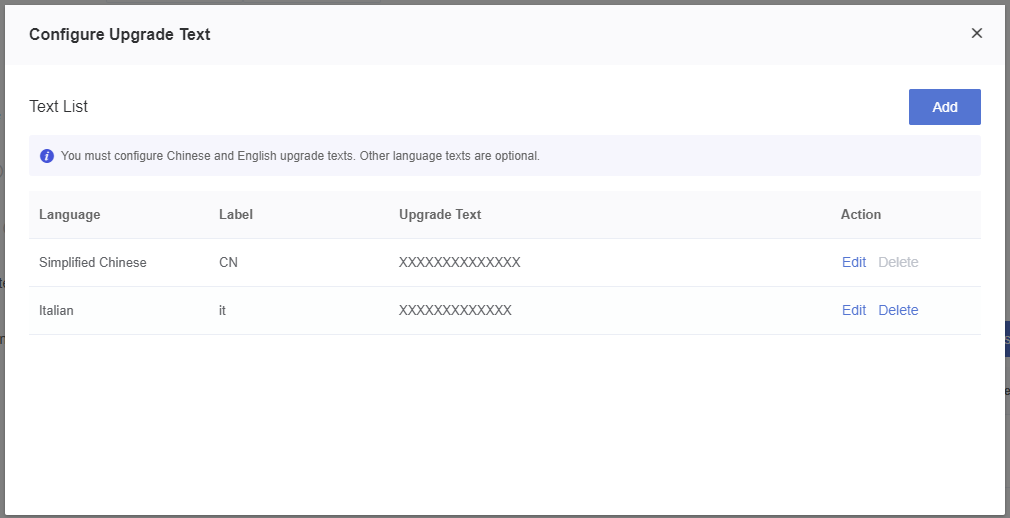
iv. Configure Upgrade Text
Upgrade text configuration is required in manual upgrades but can be omitted in silent upgrades. You must configure Chinese and English upgrade texts, and the texts in other languages are optional.
v. Activate Upgrade Plan
After completing the above steps of Add a Version Package and Create an Upgrade Plan, you can click "Activate Plan" in the lower left corner to activate the configured plan. Then Developer Center will execute the upgrade task and distribute the selected target version firmware to the target devices.
Note: The activated upgrade tasks cannot be deleted
d. Initialize the Device and Connect It to Developer Center
To establish device management and OTA upgrade, initialize the device and connect it to Developer Center. This connection needs to be safe and stable to ensure communication between the device and Developer Center.
c
/* Initialize QuecThing SDK */
Ql_iotInit();
/* Register event callback function */
Ql_iotConfigSetEventCB(Ql_iotEventCB);
/* Access Developer Center */
Ql_iotConfigSetConnmode(1);
Note: The device connected to Developer Center over MQTT protocol will be automatically created on Developer Center.
e. Request an OTA Upgrade
Precondition: Before requesting an OTA upgrade, make sure that the device is connected to Developer Center.
- Once the upgrade plan is made and activated, the device can request an OTA upgrade by calling Ql_iotCmdOtaRequest().
- Ec. The device does not need to send an OTA upgrade request to Developer Center and Develop Center verifies the upgrade plan and issues the plan to the device every 10 minutes, such as 10:00 or 10:10.
Note: This function is supported in QuecThing SDK version 2.9.2 and above.
Sample code
c/* Request an OTA upgrade plan from Developer Center. */ Ql_iotCmdOtaRequest(0);
f. Check Upgrade Result
Once the device sends the OTA request command, it will automatically report the event (7,10700) to Developer Center via Ql_iotEventCB if it is included the upgrade plan. The event includes essential information such as the component identifier + source version + target version + minimum power + minimum signal strength + firmware package size. If the device meets the upgrade strategy requirements specified in the plan, it will confirm the upgrade by calling Ql_iotCmdOtaAction().
Issue the upgrade plan. The reported content is shown as follows (including component identifier, source version, target version, minimum power, minimum signal strength, and disk space required for OTA upgrade).
c7, 10700,"<componentNo>","<sourceVersion>","<targetVersion>",<batteryLimit>,<minSignalIntensity>,<useSpace>Sample code of processing the event callback function:
cvoid Ql_iotEventCB(quint32_t event, qint32_t errcode, const void *value, quint32_t valLen) { switch (event) { /* OTA upgrade event */ case QIOT_ATEVENT_TYPE_OTA: { switch (errcode) { /* Detect an upgrade plan */ case QIOT_OTA_TASK_NOTIFY: { char *words[100]; /* Disassemble the strings */ quint32_t count = Quos_stringSplit((char *)value,HAL_STRLEN(value), words, sizeof(words) / sizeof(words[0]),",", FALSE); printf("recv ota task\r\n"); if(count < 6) { break; } /* Ensure whether the device meets the requirments for the upgrade strategy */ printf("componentNo:%s,sourceVersion:%s,targetVersion:%s,batteryLimit:%s,minSignalIntensity:%s,minSignalIntensity:%s\r\n", words[0],words[1],words[2],words[3],words[4],words[5]); /* Device starts upgrading*/ Ql_iotCmdOtaAction(1); break; } } } } }
g. Device Upgrade Process Feedback
A successful FOTA upgrade involves 5 steps: Download start, Download in progress, Successful download, Upgrade in progress and Successful upgrade. Each upgrade step triggers a corresponding event reported through Ql_iotEventCB. The events provide feedback on the progress of the FOTA upgrade process as follows:
First event, triggered when the device starts downloading the firmware package includes component identifier, firmware package size and MD5 value of the firmware package.
cvoid (*eventCB)(7,10701,"<componentNo>",length,"<MD5>");Second event, triggered during firmware downloading, indicates that the firmware is being downloaded.
cvoid (*eventCB)(7,10702,NULL,0);Third event, triggered once the firmware package is downloaded successfully, includes the component identifier, firmware package size, start address of the current downloaded block and size of the current file block.
cvoid (*eventCB)(7,10703,"<componentNo>","<length>","<startaddr>","<piece_length>");
Sample code of event callback function:
c
void Ql_iotEventCB(quint32_t event, qint32_t errcode, const void *value, quint32_t valLen)
{
    switch (event)
    {
    	/* OTA upgrade event */
	    case QIOT_ATEVENT_TYPE_OTA:
	    {
	        switch (errcode)
	        {
			    /* Successful download */
			    case QIOT_OTA_DOWNLOADED:
			    {
			        char *words[100];
			        quint32_t count = Quos_stringSplit((char *)value,HAL_STRLEN(value), words, sizeof(words) / sizeof(words[0]),",", FALSE);
			        printf("ota download complete\r\n");
			        if(count < 4)
			        {
			            break;
			        }
			        printf("componentNo:%s,length:%s,startaddr:%s,piece_length:%s\r\n",words[0],words[1],words[2],words[3]);

			    }
	        }
        }
	}
}
Fourth event, triggered during the FOTA upgrade process, indicates that the firmware upgrade is in progress.
cvoid (*eventCB)(7,10704,NULL,0);Fifth event, triggered upon successful upgrade, indicates that the firmware is upgraded successfully.(After the firmware is upgraded, the module will automatically reboot.)
cvoid (*eventCB)(7,10705,NULL,0);
After the device upgrade, it will be automatically report the upgrade result when it restarts and connects to Developer Center, marking the end of the process.
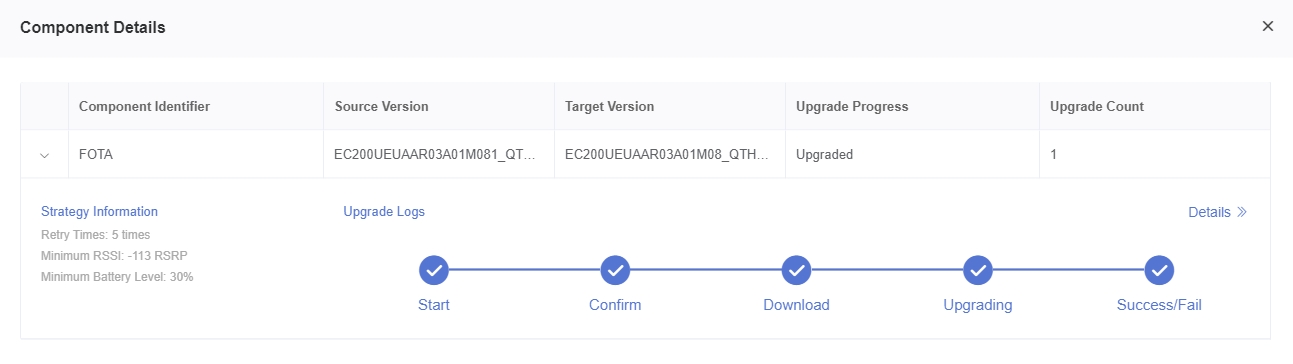
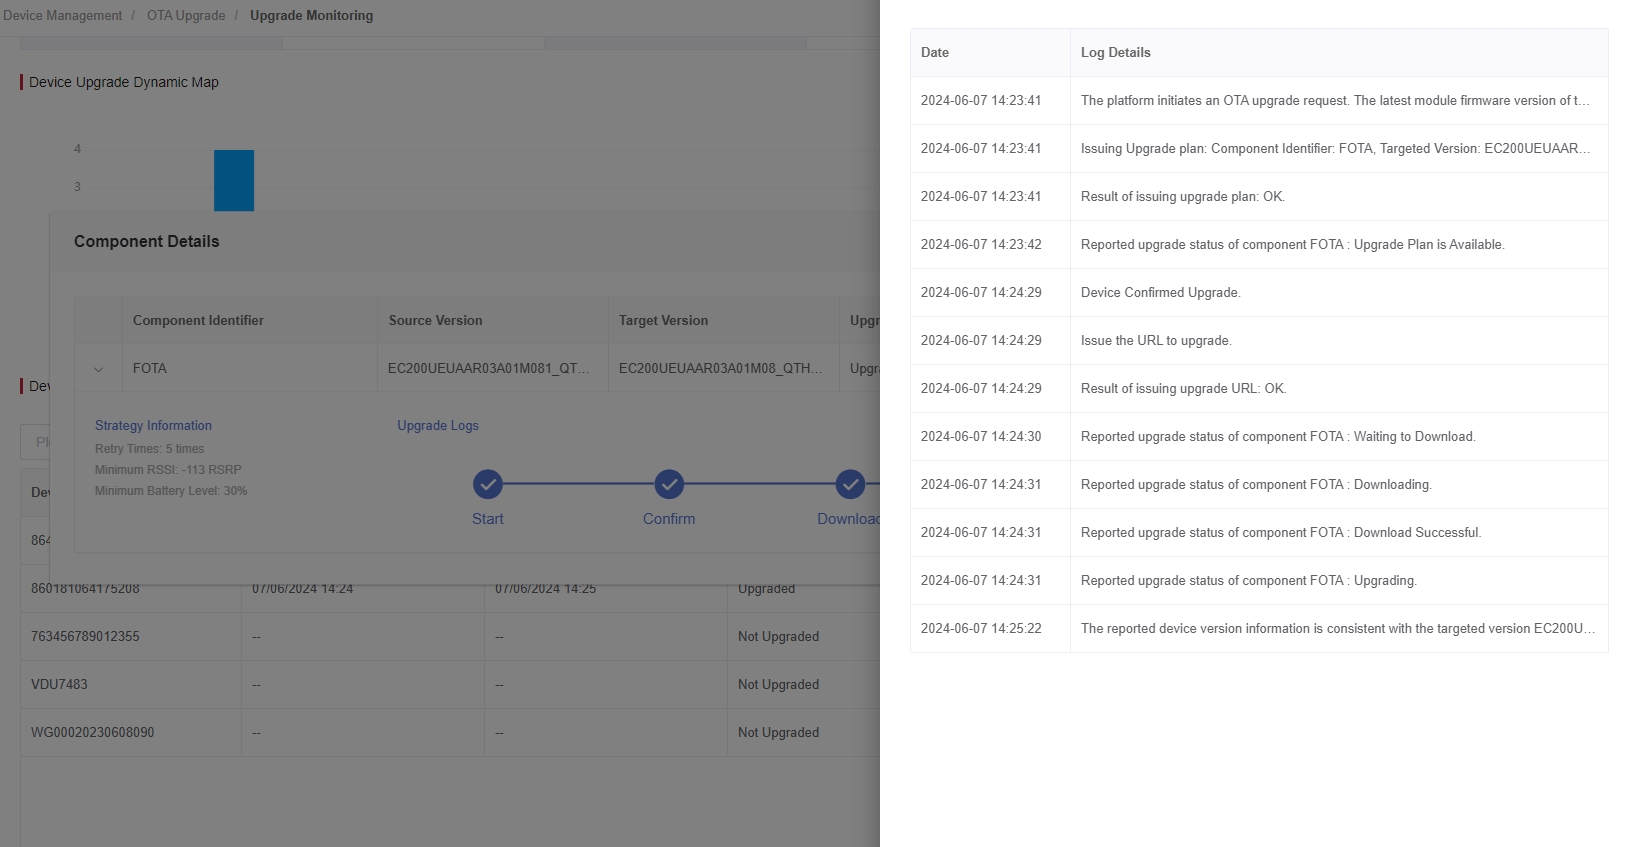
4. Monitor Upgrade
Click "Upgrade Monitoring" in the upgrade plan list. In the device upgrade list, you can view the upgrade status of all devices in this plan.
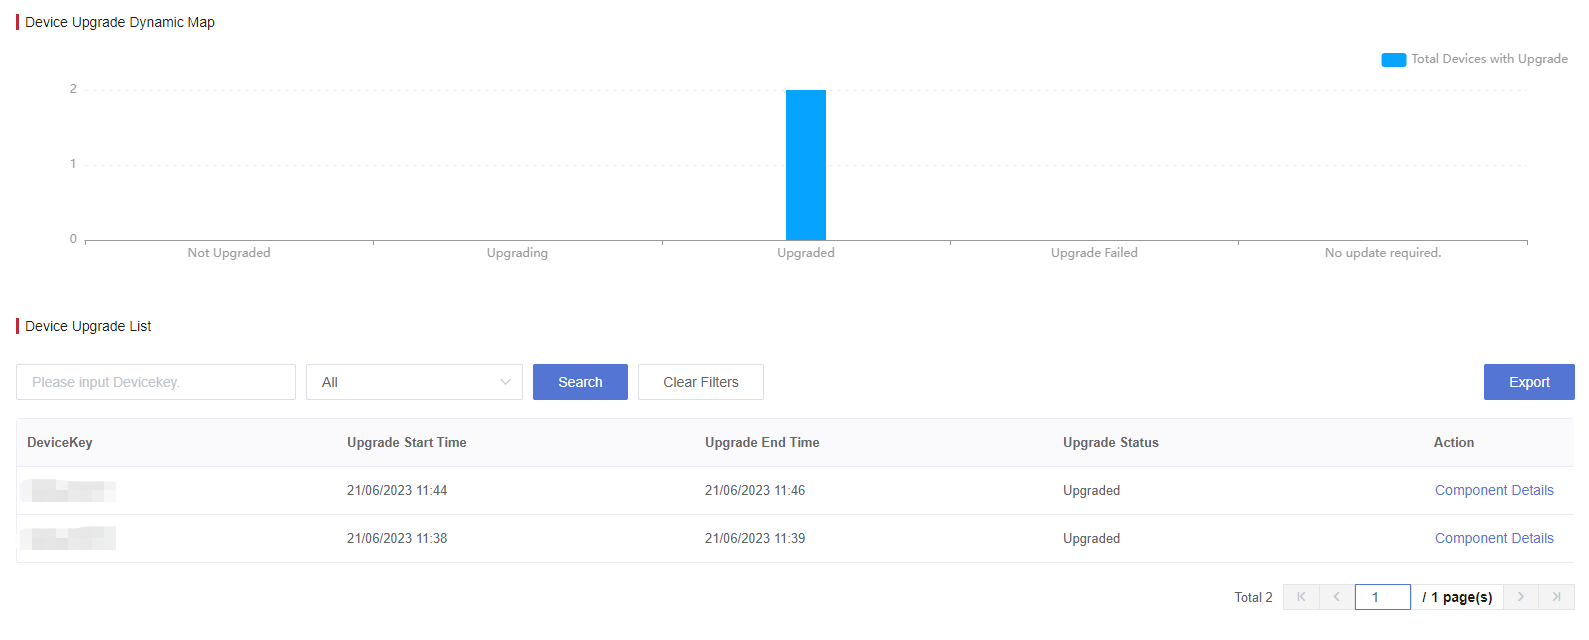
Click "Component Details" to view the upgrade logs as shown in the following figure;